How to Schedule a Post on Facebook: A Step-by-Step Guide

While platforms like Twitter, Instagram, and even TikTok have gained significant user ground over the past few years, one social channel is still the market leader: Facebook.
Recently, the Pew Research Center revealed that nearly 70% of all U.S. adults use Facebook, while 74% log on daily. Worldwide, Facebook has more than 2.7 billion users.
And, today, regularly posting timely and relevant content on Facebook is key to reaching its big and broad audiences.
Why? Trends, content, and discussion on any social media channel move much faster than they do on older platforms, like television or radio.
While content is vital to winning over audiences, quickly and consistently creating new social posts can overwhelm even tech-savvy social media managers.
While creating content manually comes with the advantage of right-now relevance, it also requires site owners to constantly track trends and interactions on Facebook, then craft relevant posts to leverage current conditions.
But what happens if site owners aren’t online? What if users halfway around the world are just waking up and looking for content while social managers are still asleep. Scheduled posts can help.
There’s a solution for many of the problems above: Scheduled Facebook posts.
Facebook’s post scheduling tool lets you to launch pre-created content on your Facebook Business page on a predetermined date and time. By scheduling a few posts in advance each week, you and your team can keep normal work hours while even free yourselves up for brainstorming new social media strategies.
While it’s still critical to create manual posts that speak to specific events or emerging market conditions, scheduled posts can help streamline your social efforts at scale.
Not sure how to schedule an engaging Facebook post? We’ll walk you through how to to do this, as well as how to solve common scheduling issues below.
We’ll start with the steps for scheduling a standard post. If you’re interested in learning how to schedule a share of another page’s post, click here to go to that section.
Step 1: Log into your Facebook Business page.
The first step in making a scheduled Facebook post is making sure you’re logged into your business page. Currently, personal pages don’t offer the same range of publishing tools.
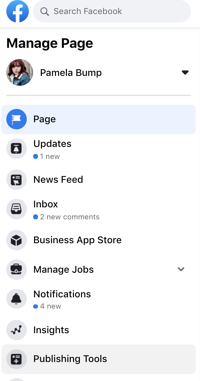
Step 2: Click on “Publishing Tools.”
In the left menu of your business Facebook page, click on “Publishing Tools.” This will bring up a list of all published posts, as well as options to see your scheduled posts, drafts, and expiring posts.
Step 3: Create a compelling post.
Select “Create Post” at the top of your post. Write your post in the provided text box and add any images or links — you’ll get a real-time preview of the post as you create it to help identify any potential issues.
<img src="https://blog.hubspot.com/hs-fs/hubfs/Screen%20Shot%202020-12-08%20at%201.38.05%20PM.png?width=600&name=Screen%20Shot%202020-12-08%20at%201.38.05%20PM.png" alt="Click Create Post or …read more
Source:: HubSpot Blog


