How to Lock Cells in Google Sheets

Imagine spending hours creating a Google Sheet to share with your team, only to find that a team member accidentally deleted an important column, row, cell, or, even worse — an entire sheet.
That can be frustrating. However, it’s entirely preventable if you lock cells in Google Sheets.
As it turns out, with just a few clicks of a mouse, you can lock cells and entire sheets in Google Sheets — meaning, you and your team can work on the same sheet without hindering the next person from completing their assigned tasks.
In this post, we’ll go over how to lock and unlock cells in Google Sheets.
Table of Contents
- The Benefits of Locking Cells in Google Sheets
- How to Lock Specific Cells in Google Sheets
- How to Lock Cells and Give Editing Permissions to Select Users
- How to Lock an Entire Sheet
- How to Show a Warning but Allow Editing of a Locked Cell
- How to Unlock Cells
The Benefits of Locking Cells in Google Sheets
Google Sheets allows users to lock cells from editing, which means you can protect your Sheet from any potential accidents, including editing and deletion.
You can also protect important data and calculations, so you can rest easy knowing the formulas in your Sheet are correct and accurate.
The ability to lock cells in Google Sheets comes with a variety of benefits.
Not only can you lock cells from editing, but you can also control which team members can edit your document — right down to the very cells those team members are allowed to manipulate.
This is extremely helpful if multiple team members are working on the same Sheet at once. You can also copy permissions from other sheets, if you have locked cells in other Sheets.
Let’s take a look at the steps to lock cells in Google Sheets.
How to Lock Specific Cells in Google Sheets
Locking specific cells in Google Sheets is a simple task. Here’s how to do it:
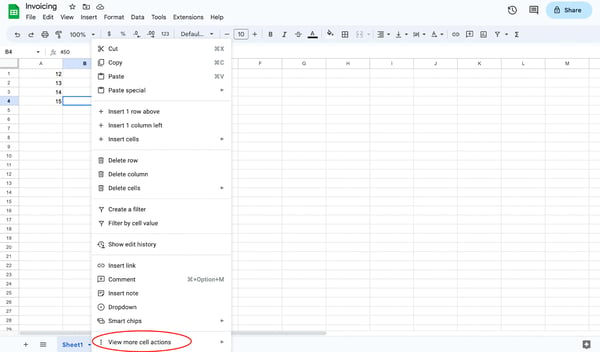
1. Right-click on the cell you want to lock.
After opening a new Google Sheet (or a Sheet you have already been working in), right-click on the cell or cells you want to lock.
2. Hover over “View more cell actions.”
This option is listed at the bottom of the dropdown menu.
Depending on where your cells are located in the Sheet, you may need to scroll down until you see it. When you see it, hover over the “View more cell actions” to open up another menu.

3. Select “Protect range.”
The next menu will give you several more cell actions. Look for the action labeled “Protect range.” Choose “Protect range” to begin assigning cells to a …read more
Source:: HubSpot Blog

![→ Access Now: Google Sheets Templates [Free Kit]](https://no-cache.hubspot.com/cta/default/53/e7cd3f82-cab9-4017-b019-ee3fc550e0b5.png)


