How to Create an Editorial Calendar in Google Calendar [Free Templates]

By cwainwright@hubspot.com (Corey Wainwright)

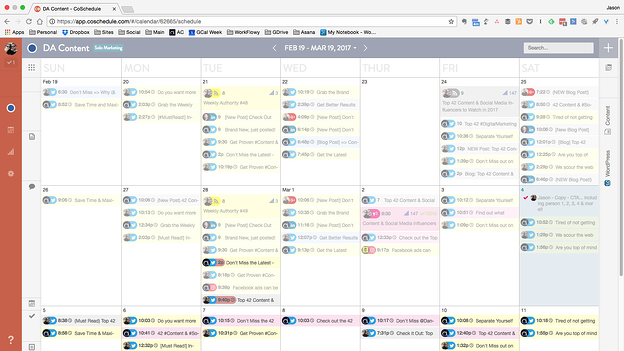
One of the most frequent questions we get from aspiring and current inbound marketers is, “How do you manage all of that content?”
The answer: we rely on an editorial calendar in Google Calendar to stay keep our content organized.
There are a lot of great calendar tools out there you can choose from. In fact, for those of you who are HubSpot customers, there’s a marketing calendar built right into HubSpot’s software. But after trying a ton of other solutions, our team found that we really operated the best with just a simple Google Calendar. In fact, this has actually been the longest-running editorial calendar solution our team has ever seen.
Here’s how we set it up.
Follow Along With Free Editorial Calendar Templates
Download the Template for Free
1. Download HubSpot’s free editorial calendar templates.
First thing’s first: Download the calendar templates, above (they’re free.) By doing this, you’ll have three editorial calendar templates on your computer to use at your leisure: one for Google Calendar, one for Excel, and one for Google Sheets. In this blog post, we’ll be going over how to import the Excel template into Google Calendar.
2. Customize your template and prepare for import into Google Calendar.
By default, the publish dates on the templates you download will be stamped for the year 2016. Feel free to change them to the present year in the spreadsheet itself — you can also drag them to the dates of your choosing after you upload the file into Google Calendar.
Google Calendar makes it easy to load a calendar you might have pre-created in another program into Google. This includes Microsoft Excel. Here’s how to import the Excel calendar template you downloaded in the previous step into Google Calendar:
3. Open Google Calendar.
Once you’ve downloaded (or, for that matter, created) a calendar that opens in Microsoft Excel, it’s time to open Google Calendar. Just make sure you’re already logged into the Gmail account you want this calendar to give access to.
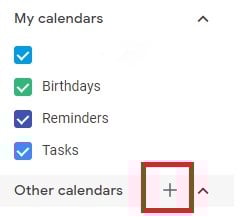
4. Use the lefthand dropdown menu to create a new calendar.
Now it’s time to set up your Google Calendar to accommodate the information in your Excel spreadsheet. First, go into your Google Calendar and click the plus sign to the right of “Other Calendars,” as shown in the screenshot below. In the dropdown menu that appears, select “Create new calendar.”
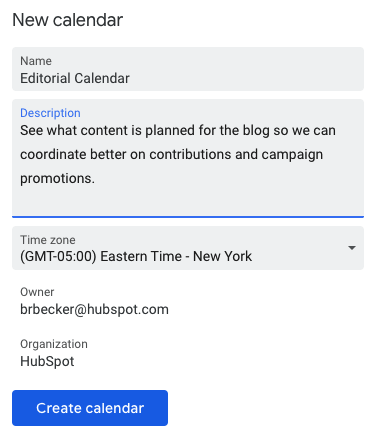
5. Fill out the details of your new calendar.
Fill out the fields that appear on the next screen. This includes a brief description of your calendar, as shown below, to give people proper context when you invite them into this calendar. When you’re done filling in the details, click “Create calendar.”
6. Import your XLS or CSV file from the same dropdown …read more
Source:: HubSpot Blog