How to Post on Instagram: A Step-by-Step Guide

With over 1 billion active users, Instagram is undoubtedly one of the most far-reaching social media networks you can use for marketing purposes.
Instagram has proven a viable advertising option for businesses today, and shows no signs of slowing down — in fact Instagram ad revenues will exceed $18 billion in ad revenue in 2021.
If you’re not already using Instagram for your business, you’re missing out on a ton of opportunity to grow brand awareness and reach a wide audience. Fortunately, adopting an Instagram strategy can be relatively easy with enough time and effort.
However, if you’ve never used the app, you might be daunted by the first question likely to cross your mind — How can I post my first image?
If you’re ready to post an image to Instagram, we’ve got you covered. Here, we’ve cultivated a quick-and-easy guide to posting on Instagram, to ensure you can begin attracting the attention of your audience with Instagram marketing.
Posting to Instagram consistently can help businesses find resonance with their audience and grow better, but doing it right is just as important. Here’s how to post to your Instagram account step-by-step.
1. Tap the + icon at the top of your screen.
See that plus sign [+] in the image above? That’s your starting point. See that post from our culture account? That’s your end point. Click that plus sign and you’ll be ready for the next step, below.
2. Choose a photo or video from your library or shoot one in the app.
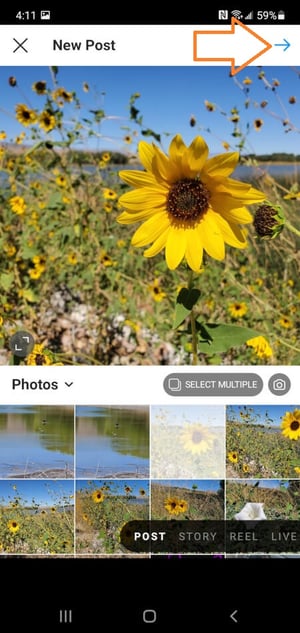
Instagram will show you the photos already saved to your phone. Choose one of those to post. Alternatively, you can click on the camera icon to take a photo or video within the Instagram app itself, if you don’t already have an image you want to use.
Once you select and crop an image (or carousel of multiple images), click the arrow button in the top right corner of the app.

5. Try a carousel post of multiple images.
Do you have multiple photos and want to highlight them all? Instagram allows you to do this with its carousel feature.

As you go to tap a photo or video, first tap the icon just above your photos to the right that looks like stacked squares. Once you tap this, you’ll see a number on the corner of every image or video you tap. This number notes where the content will show up in the carousel.
4. Crop the image.
You aren’t limited to just a square image on Instagram. You can actually share horizontal or vertical images as well. To get more of your image seen, pinch the screen of the photo you’ve selected on the Library screen.
<img src="https://blog.hubspot.com/hs-fs/hubfs/Instagram-Crop-Photo-1.jpg?width=300&name=Instagram-Crop-Photo-1.jpg" alt="Cropping Photo on Instagram by Pinching" width="300" style="width: 300px;margin: 0px …read more
Source:: HubSpot Blog


